Maker Camp is funded in part by the Gordon and Betty Moore Foundation and the generous support of the Members of Make: Community.

2 Hours
TO COMPLETE

WHAT WILL YOU MAKE?

WHAT WILL YOU NEED?
- Cardboard sheets
- Strong tape
- Scissors
- Pencil
- Paints
- Paintbrushes
STEP 1
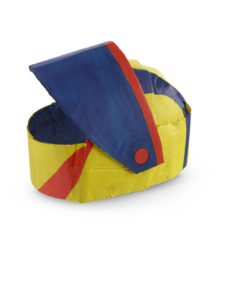
To make the frame, cut out two long strips of cardboard. Wrap one horizontally around your balloon stand at mouth height. Bend the other strip over the top, angling it toward the back slightly.
STEP 2
Stick the two strips together on either side of the join, using strong tape. Repeat on the other side.
STEP 3
Now bring the ends of the horizontal strip together, at the front of the balloon stand. Overlap the edges slightly and tape them together.
STEP 4
Trim the ends off the vertical strip, so they are level with the horizontal strip. Add extra tape on the inside to strengthen the joins.
STEP 5
To fill in the hole at the back of the helmet, cut out three cardboard rectangles. Position one of your rectangles centrally and secure it with strong tape.
STEP 6
Tape the other two rectangles on either side of the piece you attached in step 5, to cover the gaps.
STEP 7
To make the visor, draw a stretched semicircle shape on a piece of cardboard and then cut the shape out.
STEP 8
Bend the visor into a curved shape and tape the ends to either side of your helmet. Tape it on the inside too, to strengthen it.
STEP 9
Use the template to draw half of the faceguard on a piece of cardboard. Flip the template to draw the other half, then cut it out.
STEP 10
Fold the faceguard in half from point to point, then bend it into a curved shape on either side of the fold.
STEP 11
With the folded edge pointing outward, attach the ends of the faceguard to either side of the helmet, using strong tape.
STEP 12
Now make the plume. Lay your helmet on its side on a piece of cardboard and use it as a guide to draw the plume. Then cut out the shape.
STEP 13
To attach the plume to the helmet, cut out two cardboard rectangles. Fold the pieces in half to create tabs, then tape them to the plume.
WHAT'S NEXT?
You can use the basic frame of the knight’s helmet to make other types of headgear. How about a crash helmet or a superhero’s mask? Simply repeat steps 1-6 to create the frame and then add different features.
To make a racing helmet, make a wide visor which covers more of your face. Then you are ready to race!
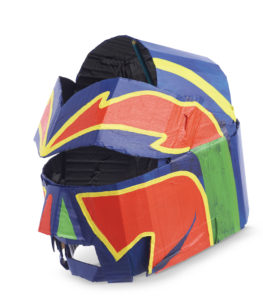
For a superhero’s mask, make the visor a V-shape and position it lower. Cut out a gap for your mouth and add a nose piece.
Please Note
Your safety is your own responsibility, including proper use of equipment and safety gear, and determining whether you have adequate skill and experience. Power tools, electricity, and other resources used for these projects are dangerous, unless used properly and with adequate precautions, including safety gear and adult supervision. Some illustrative photos do not depict safety precautions or equipment, in order to show the project steps more clearly. Use of the instructions and suggestions found in Maker Camp is at your own risk. Make Community, LLC, disclaims all responsibility for any resulting damage, injury, or expense.
ALL DONE? SHARE IT!
Share pictures and videos of your cool build! Be sure to use #maketogether or #makercamp
POST YOUR PROJECTSKits and Books From Maker Shed
Make: produces a variety of great products and helpful project tutorials to enhance your making experience.

